本文主要是来安利大家基于 Azure 的认知服务,主要是文本认知服务,可以做到分析输入文本的情绪,以及判断当前输入文本所属语言等功能
本文分为两个部分 ,一个就是在 Azure 上的配置,另一个就是 WPF 端的使用
在 Azure 上我用的是 世纪互联 的一块钱订阅,可以用一块钱订阅一个月的试用,这就是为什么我这几天都会写 Azure 相关博客的原因
登录 Azure 控制台,新建一个 认知服务 新建方法基本上看界面就会了,而微软的界面会改来改去,我就不放详细的步骤了
这个服务属于新建完成就完成 Azure 端的部署

在开始之前还请小伙伴看一下定价层是否是免费的哈,点击资源管理,点击定价层,选择免费,点击下方的选择按钮
接下来还需要点击 密钥和终结点 复制粘贴密钥和访问地址

在上面的图片可以看到有两个密钥,其实这两个密钥可以在代码里面使用任意一个,在这里放两个只是为了在一个失效之后可以备用另一个
新建一个 WPF 项目,在项目里面通过 NuGet 安装 Microsoft.Azure.CognitiveServices.Language.TextAnalytics 库,这个是 2.1 版本的,最新版本是 3.0 预览版。不过 3.0 预览版需要 Azure 服务器的支持,暂时中国微软的版本是不支持的,如果使用 3.0 的预览版将会提示
{code: "404", message: "Resource not found"}
使用 3.0 预览版需要安装 Azure.AI.TextAnalytics 库
安装 NuGet 库可以通过修改 csproj 的方法
  <ItemGroup>
    <!--<PackageReference Include="Azure.AI.TextAnalytics" Version="1.0.0-preview.4" />-->
    <PackageReference Include="Microsoft.Azure.CognitiveServices.Language.TextAnalytics" Version="4.0.0" />
  </ItemGroup>
被注释掉的库就是 3.0 预览版的,现在是 2020.5 这个库还是预览版
在 WPF 中添加一个简单的界面

    <Grid>
        <Grid.RowDefinitions>
            <RowDefinition></RowDefinition>
            <RowDefinition></RowDefinition>
            <RowDefinition Height="Auto"></RowDefinition>
        </Grid.RowDefinitions>
        <Grid>
            <TextBox x:Name="Text" Margin="10,10,10,10" TextWrapping="Wrap" AcceptsReturn="True"></TextBox>
        </Grid>
        <Grid Grid.Row="1">
            <TextBox x:Name="ShowText" Margin="10,10,10,10" IsReadOnly="True" TextWrapping="Wrap"></TextBox>
        </Grid>
        <StackPanel Margin="10,10,10,10" Grid.Row="2" Orientation="Horizontal">
            <StackPanel.Resources>
                <Style TargetType="Button">
                    <Setter Property="Margin" Value="10,10,10,10"></Setter>
                </Style>
            </StackPanel.Resources>
            <Button Content="情绪分析" Click="SentimentAnalysis_OnClick"></Button>
            <Button Content="语言检测" Click="LanguageDetection_OnClick"></Button>
            <Button Content="命名实体识别 (NER)" Click="RecognizeEntities_OnClick"></Button>
            <Button Content="关键短语提取" Click="KeyPhraseExtraction_OnClick"></Button>
        </StackPanel>
    </Grid>
在使用之前需要创建客户端模型,需要传入刚才复制的 key 和终结点 也就是访问地址
        private static TextAnalyticsClient GetAnalyticsClient()
        {
            var key = "d131f725093f460c99a09580beba34ed";
            var endpoint = "https://lindexi.cognitiveservices.azure.cn/";

            var credentials = new ApiKeyServiceClientCredentials(key);
            TextAnalyticsClient client = new TextAnalyticsClient(credentials)
            {
                Endpoint = endpoint
            };

            return client;
        }
请将上面的 key 和 endpoint 替换为你自己 Azure 的
上面的 ApiKeyServiceClientCredentials 是自己实现的类,请看代码
    class ApiKeyServiceClientCredentials : ServiceClientCredentials
    {
        public ApiKeyServiceClientCredentials(string apiKey)
        {
            _apiKey = apiKey;
        }

        public override Task ProcessHttpRequestAsync(HttpRequestMessage request, CancellationToken cancellationToken)
        {
            if (request == null)
            {
                throw new ArgumentNullException(nameof(request));
            }

            request.Headers.Add("Ocp-Apim-Subscription-Key", _apiKey);
            return base.ProcessHttpRequestAsync(request, cancellationToken);
        }

        private readonly string _apiKey;
    }
在拿到 TextAnalyticsClient 类就可以调用很多有趣的方法了,本文的例子用的是同步的方法,但是推荐在实际项目中使用异步的方法。使用同步的方法会让界面卡顿
下面是界面的各个方法实现
       private void SentimentAnalysis_OnClick(object sender, RoutedEventArgs e)
        {
            var client = GetAnalyticsClient();

            var sentiment = client.Sentiment(Text.Text, "zh");
            ShowText.Text = $"分数:{sentiment.Score:0.00} \r\n 评分接近 0 表示消极情绪,评分接近 1 表示积极情绪";
        }

        private void LanguageDetection_OnClick(object sender, RoutedEventArgs e)
        {
            var client = GetAnalyticsClient();
            var detectLanguage = client.DetectLanguage(Text.Text);
            ShowText.Text =
                $"判断出可能的语言有 {detectLanguage.DetectedLanguages.Count} 个 \r\n {string.Join("\r\n", detectLanguage.DetectedLanguages.Select(temp => $"语言 {temp.Name} 分数 {temp.Score:0.00}"))}";
        }

        private void RecognizeEntities_OnClick(object sender, RoutedEventArgs e)
        {
            var client = GetAnalyticsClient();
            var result = client.Entities(Text.Text);
            ShowText.Text = "";
            foreach (var entity in result.Entities)
            {
                ShowText.Text +=
                    $"Name: {entity.Name},\tType: {entity.Type ?? "N/A"},\tSub-Type: {entity.SubType ?? "N/A"} \r\n";
                foreach (var match in entity.Matches)
                {
                    ShowText.Text +=
                        $"\tOffset: {match.Offset},\tLength: {match.Length},\tScore: {match.EntityTypeScore:F3}\r\n";
                }
            }
        }

        private void KeyPhraseExtraction_OnClick(object sender, RoutedEventArgs e)
        {
            var client = GetAnalyticsClient();
            var result = client.KeyPhrases(Text.Text);
            ShowText.Text = $"关键词: {string.Join(";", result.KeyPhrases)}";
        }
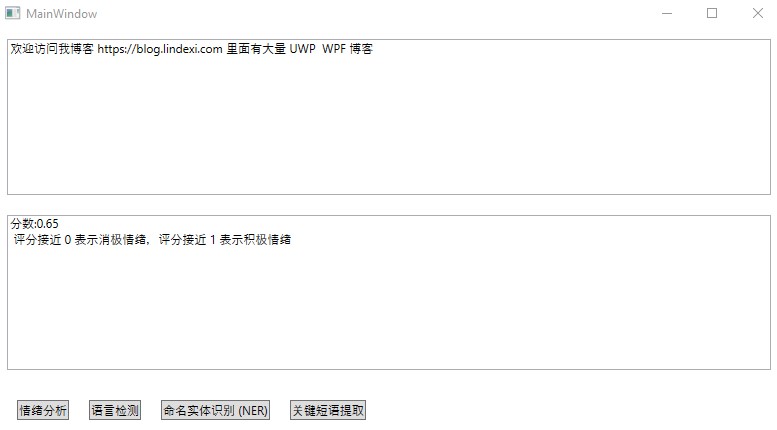
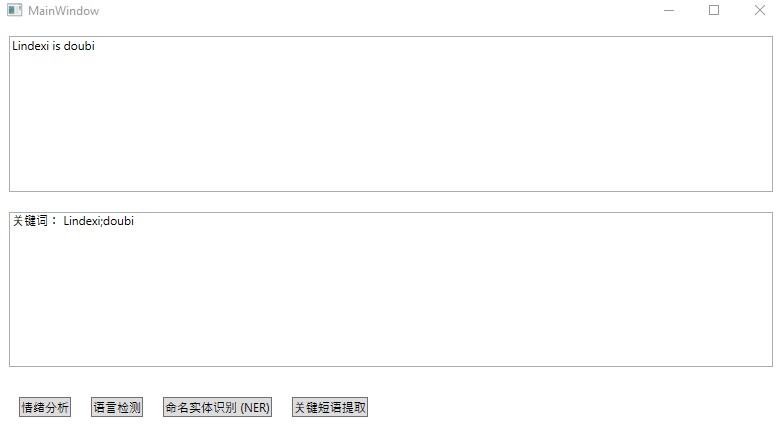
大概运行效果如下
情绪分析可以分析出一句话是积极的还是消极的,使用分数表示,评分接近 0 表示消极情绪,评分接近 1 表示积极情绪

语言检测主要用来分析当前输入文本属于哪个语言

如输入英文就会判断当前是英文

命名实体用来分析文本里面的某些单词是属于什么,例如某些单词是人的名字,某些单词是时间等

关键短语提取可以用来提取一句话中的关键词

整体功能还是很爽的,特别是开发特别简单。而服务本文是中国微软速度也特别快,本文用的是同步的代码,但实际上界面也不卡
快速入门:文本分析客户端库 v3 - Azure Cognitive Services
本文代码放在 github 欢迎小伙伴访问
本文会经常更新,请阅读原文: https://dotnet-campus.github.io//post/WPF-%E5%9F%BA%E4%BA%8E-Azure-%E7%9A%84%E8%AE%A4%E7%9F%A5%E6%9C%8D%E5%8A%A1-%E6%83%85%E7%BB%AA%E5%88%86%E6%9E%90-%E8%AF%AD%E8%A8%80%E6%A3%80%E6%B5%8B-%E5%85%B3%E9%94%AE%E7%9F%AD%E8%AF%AD%E6%8F%90%E5%8F%96.html ,以避免陈旧错误知识的误导,同时有更好的阅读体验。
 本作品采用
知识共享署名-非商业性使用-相同方式共享 4.0 国际许可协议
进行许可。欢迎转载、使用、重新发布,但务必保留文章署名
lindexi
(包含链接:
https://dotnet-campus.github.io/
),不得用于商业目的,基于本文修改后的作品务必以相同的许可发布。如有任何疑问,请
与我联系
。